HOWTO: Create a Custom VMware vSphere 6.x ESXi Image using PowerCLI
VMware PowerCLI vSphere ESXi
Published on 12 April 2016 by Christopher Lewis. Words: 458. Reading Time: 3 mins.
Introduction
As part of the continual (re)deployment and evolution of my home lab I have created a custom ESXi image to include a VIB for my Synology SAN. Whilst I will concentrate on the steps required to complete this specifically for the Synology, the principle applies to any home lab or indeed any Production environment that needs a custom VMware vSphere ESXi Image.
Required Software:
- VMware PowerCLI (latest available)
- VMware vSphere offline bundle downloadable from VMware (I’m using the 6.0U2 bundle)
- Synology NFS (ZIP) downloadable from Synology (I have the DS1815+)
I try to be structured when it comes to scripting and this sort of thing, so I have create a folder structure which I will share.
Step By Step Guide
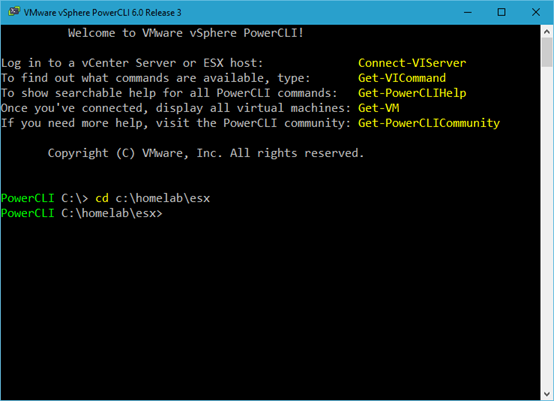
- Open PowerCLI.
- Go to the folder containing the downloaded ZIP/VIBs, in my instance this is the ESX folder using
cd c:\homelab\esx.
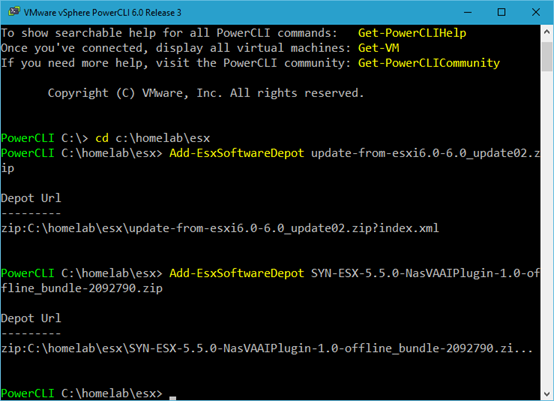
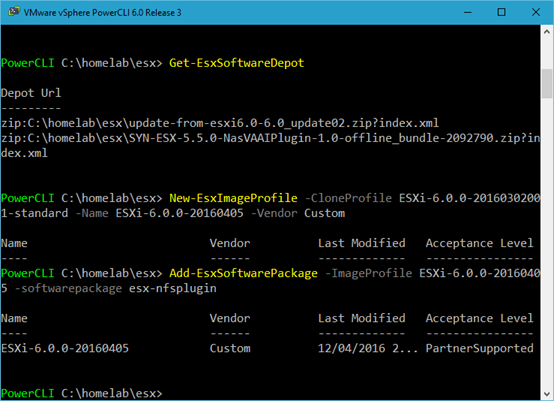
- Mount the VMware vSphere ESXi 6 Offline bundle and additional VIBs (in this instance the Synology NFS VAAI) using the
Add-EsxSoftwareDepotcommand:
Add-EsxSoftwareDepot update-from-esxi6.0-6.0_update02.zip
Add-EsxSoftwareDepot SYN-ESX-5.5.0-NasVAAIPlugin-1.0-offline_bundle-2092790.zip
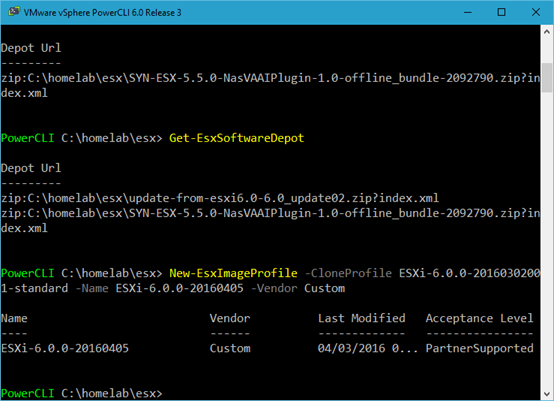
- Create a new ESX Image Profile by cloning the existing standard image using the
New-EsxImageProfilecommand.
New-EsxImageProfile -CloneProfile ESXi-6.0.0-20160302001-standard -Name <insert new image name> -Vendor Custom
- Add the extra software package(s) (in this instance the Synology NFS VAAI Plug-In) using
Add-EsxSoftwarePackagecommand:
Add-EsxSoftwarePackage -ImageProfile <new image profile> -softwarepackage esx-nfsplugin
- Create the new VMware vSphere 6 ISO image using the
Export-EsxImageProfilecommand:
Export-EsxImageProfile -ImageProfile <new image profile> -FilePath vsphere.iso –ExportToIso
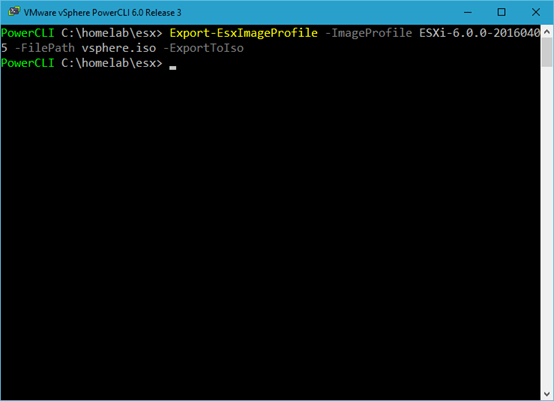
- You can now use the created ISO to build you VMware vSphere ESXi Host Servers.
Full PowerCLI Script
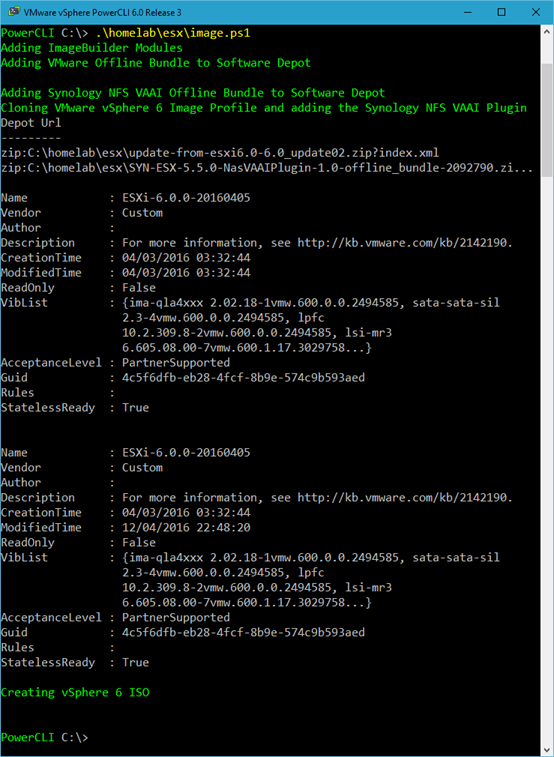
The above steps can be scripted in one Powershell/Power CLI script as follows:
$WorkingFolder = "C:\homelab\esx"
$VMwareOfflineZip = "$WorkingFolder\update-from-esxi6.0-6.0_update02.zip"
$SynologyZip = "$WorkingFolder\SYN-ESX-5.5.0-NasVAAIPlugin-1.0-offline_bundle-2092790.zip"
$NewProfile = "ESXi-6.0.0-20160405"
$NewISO = "$WorkingFolder\vSphere6-Custom.iso"
Write-Host "Adding ImageBuilder Modules" -ForegroundColor Green
Add-PSSnapin Vmware.ImageBuilder -ErrorAction SilentlyContinue
Write-Host "Adding VMware Offline Bundle to Software Depot" -ForegroundColor Green
Add-EsxSoftwareDepot $VMwareOfflineZip
Write-Host "Adding Synology NFS VAAI Offline Bundle to Software Depot" -ForegroundColor Green
Add-EsxSoftwareDepot $SynologyZip
Write-Host "Cloning VMware vSphere 6 Image Profile and adding the Synology NFS VAAI Plugin" -ForegroundColor Green
New-EsxImageProfile -CloneProfile ESXi-6.0.0-20160302001-standard -Name $NewProfile -Vendor Custom
Add-EsxSoftwarePackage -ImageProfile $NewProfile -SoftwarePackage esx-nfsplugin
Write-Host "Creating vSphere 6 ISO " -ForegroundColor Green
Export-EsxImageProfile -ImageProfile $NewProfile -FilePath $NewISO -ExportToIso
Which gives the following output within the PowerCLI console:
Get-EsxImageProfile cmdlet to view current image profiles and you will need to remove it first by running Remove-EsxImageProfile -ImageProfile <name of profile to remove>
Published on 12 April 2016 by Christopher Lewis. Words: 458. Reading Time: 3 mins.
