Warning! The content within this article is over 36 months old and, therefore, may be out of date.
HOWTO: Install PowerCLI 6.5.1 - As easy as 1-2-3!
Share this article on:


PowerCLI PowerShell VMware
Published on 24 April 2017 by Christopher Lewis. Words: 200. Reading Time: 1 mins.
Introduction
This is a very quick post on the latest version of VMware’s PowerCLI, v6.5.1. See VMware’s Official Blog here .
This is now a MODULE available from the
PowerShell Gallery
which is #Awesome because it has been a major annoyance not being able just to type Install-Module PowerCLI to install it. Instead you had to go through a standard windows install package in the past.
Step By Step Guide
Overview
- Remove existing PowerCLI installation.
- Open a Administrative PowerShell window.
- Run
Install-Module VMware.PowerCLI -Force -confirm:$false
Detailed Steps
- Firstly, you need to remove any version of PowerCLI that you currently have installed using Add/Remove Programs on your device.
- Open a Administrative Powershell Prompt (right click on the PowerShell icon and select Run As Administrator).
- If prompted by UAC, click Yes to confirm
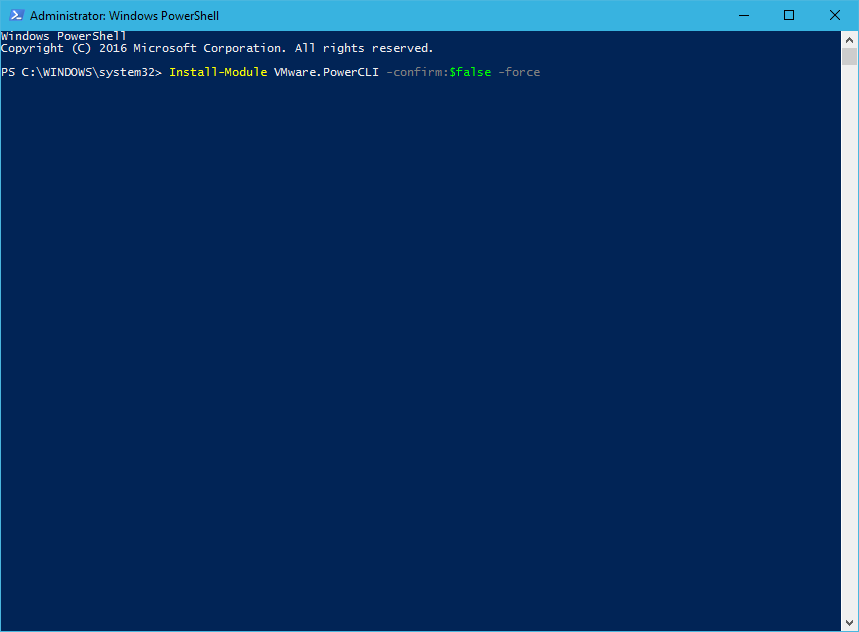
- Finally, type:
Install-Module -Name VMware.PowerCLI -Confirm:$false -Force
- press Enter.
Note:
You can optionally add additional settings/switches, run
Get-Help Install-Module for more information but I use the -Force and -confirm:$false to ensure no additional prompts are required as the PowerShell Gallery is currently an Untrusted repository Source.
And there you have it… it is as simple 1-2-3…
There are some cool new cmdlets so let’s get on with using them!
Published on 24 April 2017 by Christopher Lewis. Words: 200. Reading Time: 1 mins.
Share this article on:
Related Post(s):
- HOWTO: Automate the installation of the External Platform Services Controller using PowerCLI & JSON - Part 2 ()
- HOWTO: Automate the installation of the External Platform Services Controller using PowerCLI & JSON - Part 1 ()
- Book Review: VMware vSphere PowerCLI Reference: Automating vSphere Administration - 2nd Edition ()
- HOWTO: Create vRealize Automation User Role in vCenter using PowerCLI ()
- HOWTO: Power On a VMware Virtual Machine with PowerCLI (PowerCLI 101) ()
About the Author:

Name: Christopher Lewis
Twitter/X: thecloudxpert
Role: Domain Expert - VCF Automation & VCF Operations
Company: Broadcom
Recent Posts by Christopher Lewis:
Blog Categories:
active directory 6
aria automation 9
aria operations 2
aws 2
certificate authority 5
certificates 5
certification 91
general 9
home lab 2
microsoft 7
nsx 45
nsx v 41
powercli 8
powershell 6
vcap 48
vcap6 2
vcenter 4
vcf 5
vcix 2
vexpert 9
vmug 5
vmware 99+
vmware aria automation 9
vmware aria operations 5
vmware cloud 3
vmware explore 2
vmware identity manager 2
vmworld 36
vrealize automation 80
vrealize business 2
vrealize operations manager 5
vrealize orchestrator 13
vrealize suite 14
vrealize suite lifecycle manager 20
vsan 5
vsphere 9
windows 6
Top Tags:
active directory 6
api 18
barcelona 24
certificates 11
certification 7
howto 33
microsoft 7
multi tenancy 9
nsx v 43
platform services controller 8
powercli 8
powershell 7
psc 6
vcap 9
vcap6 45
vcap6 cma 48
vcap6 nv 37
vcix6 nv 36
vexpert 19
vmug 8
vmware 99+
vmware aria 12
vmware aria automation 9
vmworld 35
vmworld 2016 13
vmworld 2017 9
vra 13
vrealize automation 74
vrealize operations 8
vrealize orchestrator 21
vrealize suite lifecycle manager 11
vrslcm 20
vsan 7
vsphere 12