Using the vRealize Suite Lifecycle Manager (vRSLCM) API for vRSLCM Day 2 Operations - Managing Global DNS
vRealize Suite Lifecycle Manager vRSLCM API
Published on 1 December 2021 by Christopher Lewis. Words: 792. Reading Time: 4 mins.
Introduction
In this post, we will look at how we can use the VMware vRealize Suite Lifecycle Manager (vRSLCM) API to complete Day 2 Operations for managing Global DNS servers in vRSLCM.
Within vRSLCM, we can optionally configure DNS Servers that can be shared across environments and product deployments. We are going to be using cURL to run API calls to complete the following operational tasks for managing global DNS servers:
- View existing Global DNS Server(s)
- Adding a Global DNS Server
- Deleting a Global DNS Server
Note:
The REST API call for deleting DNS servers is a deprecated function.
This post is a part of a series that covers how we can install, configure and manage the vRealize Suite using the vRSLCM API.
Prerequisites
The following prerequisites are required for this blog post:
- vRSLCM 8.6.x (or above) has been deployed successfully within the environment.
- vRSLCM local administrator (admin@local) credentials.
- vCenter Administratior Account credentials have been added to vRSLCM Locker (see post Using the vRealize Suite Lifecycle Manager (vRSLCM) API to manage Locker Credentials on how to do this with the API)
Walkthrough
View existing Global DNS Servers
Overview
Using the vRSLCM REST API, we can view the vRSLCM configuration to see if there are any existing DNS Servers configured for use with the Product deployments.
API Request
The following REST API request is required:
- Request Type: GET
- Request URL: https://{vrslcm.fqdn}/lcm/lcops/api/v2/settings/dns
- Request Header(s):
- Accept: application/json
- Content-Type: application/json
- Authorization: Basic {admin@local credential hash}
- Request Body Values:
- None
API Example
An example cURL command for this REST API is:
curl --location --request GET 'https://{vrslcm.fqdn}/lcm/lcops/api/v2/settings/dns' \
--header 'Accept: application/json' \
--header 'Content-Type: application/json' \
--header 'Authorization: Basic {admin@local credential hash}'
Note:
The –insecure flag is also required if you are using self-signed SSL certificates.
API Response
The response returned from the REST API looks like this (when formatted in JSON):
[
    {
        "name": "cx-dc-01.thecloudxpert.local",
        "hostName": "172.16.10.51"
    }
]
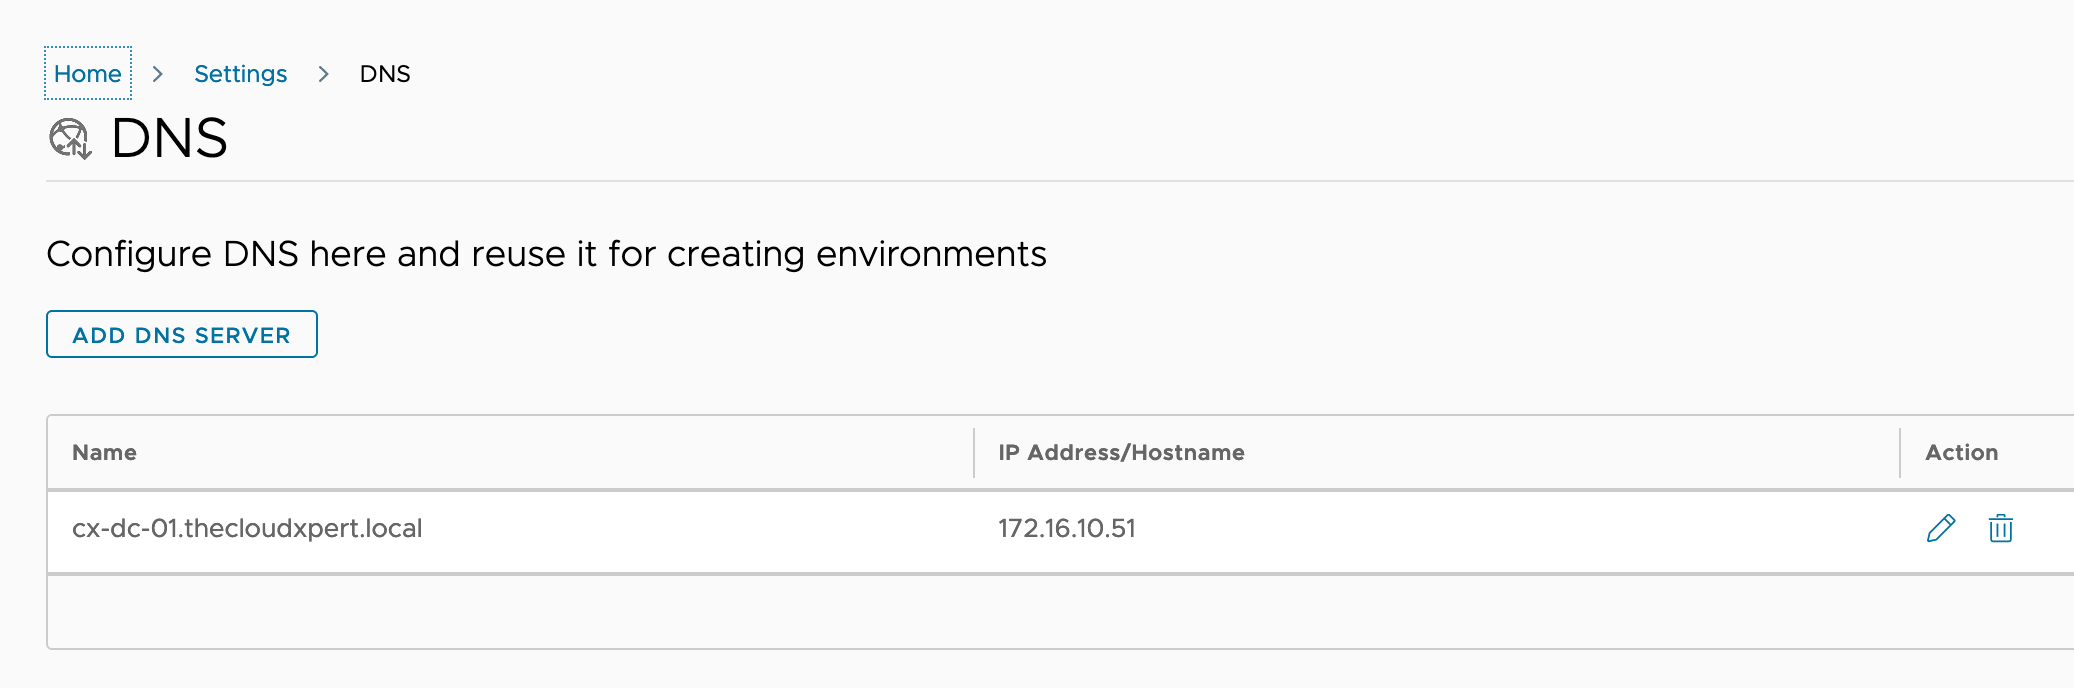
As we can see, we currently have one existing Global DNS server configured and If we logged into vRSLCM using the UI (and navigate to Lifecycle Operations > Settings > DNS Servers), we would now see:
Let us go ahead and add another one!
Adding a Global DNS Server
Overview
In this section we are going to use the vRSLCM API to add another Global DNS Server.
API Request
The following REST API request is required:
- Request Type: POST
- Request URL: https://{vrslcm.fqdn}/lcm/lcops/api/v2/settings/dns
- Request Header(s):
- Accept: application/json
- Content-Type: application/json
- Authorization: Basic {insert credential hash}
- Request Body Values:
- hostName - the IP address of the DNS Server.
- name - the user friendly name of the DNS Server for the UI.
API Example
An example cURL command for this REST API is:
curl --location --request POST 'https://{vrslcm.fqdn}/lcm/lcops/api/v2/settings/dns' \
--header 'Accept: application/json' \
--header 'Content-Type: application/json' \
--header 'Authorization: Basic {admin@local credential hash}' \
--data-raw '{
    "hostName": "172.16.10.51",
    "name": "cx-dc-02.thecloudxpert.local"
}'
API Response
The expected response returned from a successful request (Status Code=200) will be something like:
{
    "name": "cx-dc-02.thecloudxpert.local",
    "hostName": "172.16.10.52"
}
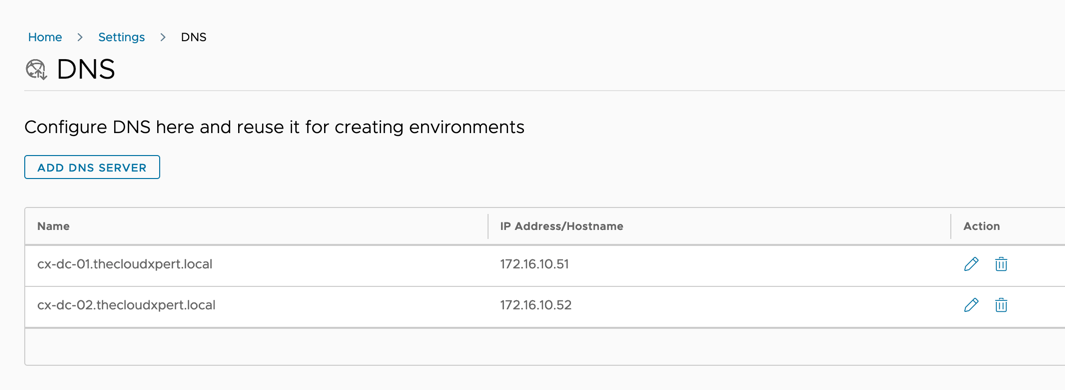
If we logged into vRSLCM using the UI (and navigate to Lifecycle Operations > Settings > DNS Servers), we would now see the following DNS servers configured:
Delete a Global DNS Server
Overview
Over time, there maybe cause to replace DNS Servers (or maybe someone just configured the wrong ones to start with). In this section we will look at the API call required to delete an existing Global DNS Server.
API Request
The following REST API request is required:
- Request Type: DELETE
- Request URL: https://{vrslcm.fqdn}/lcm/lcops/api/v3/settings/dns?dnsHostname={dns.server}
- ntpHostname - hostname/ip address of the configured DNS server (represented by the
hostNamevalue in the GET request).
- ntpHostname - hostname/ip address of the configured DNS server (represented by the
- Request Header(s):
- Accept: application/json
- Content-Type: application/json
- Authorization: Basic {insert credential hash}
- Request Body Values:
- None.
API Example
An example cURL command for this REST API is:
curl --location --request DELETE 'https://{vrslcm.fqdn}/lcm/lcops/api/v3/settings/dns?dnsHostname={dns.server}' \
--header 'Accept: application/json' \
--header 'Content-Type: application/json' \
--header 'Authorization: Basic {admin@local credential hash}'
API Response
The expected response returned from a successful request (Status Code=200) will be something like:
{
    "name": "cx-dc-01.thecloudxpert.local",
    "hostName": "172.16.10.51"
}
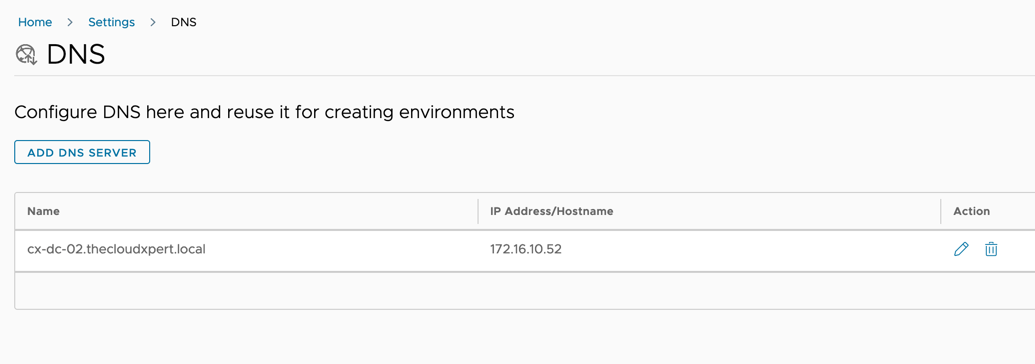
If we logged into vRSLCM using the UI (and navigate to Lifecycle Operations > Settings > DNS Servers), we would now see a single DNS Server configured:
Once the request has completed successfully, we can then use another API call to view the vCenter Servers that belong to a vRSLCM datacenter object.
Wrapping It All Up
In this short post we have explored the way we can manage Global DNS Servers in vRSLCM using the API.
If this API this snippet has been helpful, make sure you checkout the rest of the series !
Published on 1 December 2021 by Christopher Lewis. Words: 792. Reading Time: 4 mins.
- Using the vRealize Suite Lifecycle Manager (vRSLCM) API for vRSLCM Day 2 Operations - Managing Global NTP ()
- Using the vRealize Suite Lifecycle Manager (vRSLCM) API for vRSLCM Day 2 Operations - Managing Datacenters ()
- Using the vRealize Suite Lifecycle Manager (vRSLCM) API for vRSLCM Day 2 Operations - Managing Storage ()
- Using the vRealize Suite Lifecycle Manager (vRSLCM) API to track vRSLCM Requests ()
- Using the vRealize Suite Lifecycle Manager (vRSLCM) API to manage Locker Credentials ()
