VCAP6-NV Deploy - Objective 6.2 - Configure and Manage Universal Logical Network Objects
VMware NSX-V VCAP6-NV VCIX6-NV HOWTO
Published on 13 October 2017 by Christopher Lewis. Words: 612. Reading Time: 3 mins.
Objective 6.2 - Configure and Manage Universal Logical Network Objects
Objective Overview
- Create/configure Universal Logical Switches
- Create/configure Universal Distributed Logical Routers
- Configure local egress
Objective Prerequisites
The following prerequisites are assumed for this Objective:
- A working VMware vSphere 6.x environment.
- A working VMware NSX 6.x environment configured for Cross-vCenter NSX
Objective Breakdown
Create Universal Logical Switches
This is essentially the same as the creation of NSX Logical Switches (which is covered in Objective 2.1 ) except that you connect them to the Universal Transport Zone rather than a local Transport Zone. However, we’ll cover the steps again below.
- Using your favourite web browser, navigate to the vCenter Server login page ( https://vcenter.fqdn ).

- Enter appropriate User name and Password and click Login.

- Click Networking and Security.
- Click Logical Switches.

- Select Primary from the NSX Manager drop down, click Add(+)

- Enter a Name for the Universal Logical Switch, (optionally) add a Description, then at Transport Zone click Change.

- Select the target Universal Transport Zone and click OK.

- (Optionally) change the predetermined Replication Mode option, (optionally) check the Enable MAC Learning check box and then click OK.

As you can see below this Universal Logical Switch is also available on the Secondary NSX Manager.

Configure Universal Logical Switches
There isn’t a lot you can configure on a Logical Switch (Universal or otherwise). You can change the Transport Zone, the Replication Mode, Enable/Disable MAC Learning and Add/Remove Virtual Machine(s).
All of these have already been covered in Objective 2.1 .
Create/Configure Universal Distributed Logical Routers
- Using your favourite web browser, navigate to the vCenter Server login page (
https://vcenter.fqdn).
- Enter appropriate User name and Password and click Login.
- Click Networking and Security.
- Click NSX Edges and select Primary from the NSX Manager dropdown.

- Click Add(+).

- Select Universal Logical Router option and (optionally) check the Enable Local Egress checkbox.

- Enter the Name of the new Universal DLR, (optionally) enter a Hostname, (optionally) enter a Description, and (optionally) check the Enable High Availability checkbox.
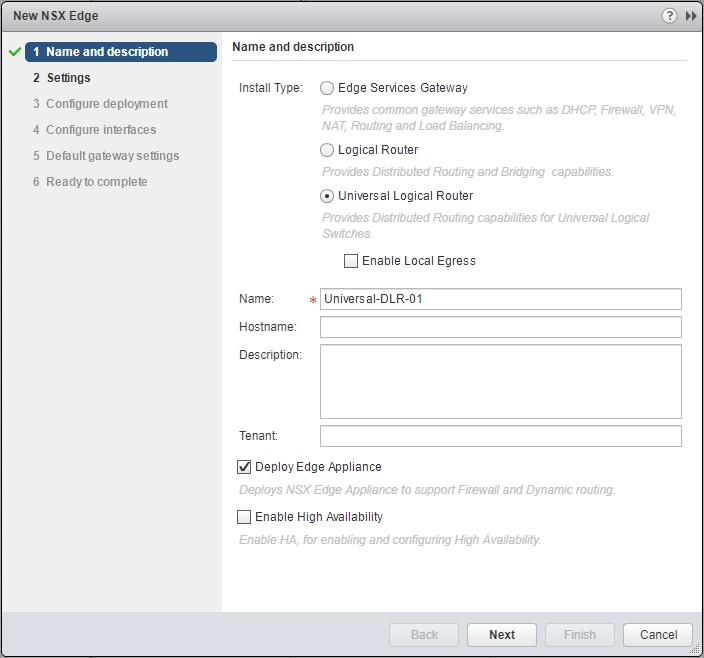
- Click Next.

- (Optionally) change the User Name, enter and confirm a Password, (optionally) check the Enable SSH access checkbox, (optionally) check the Enable FIPS mode checkbox, and select the appropriate logging level from the Edge Control Level Logging dropdown.

- Click Next.

- Select the target Datacenter from the dropdown and then click Add(+).

- Select the Cluster/Resource Pool from the dropdown, select the Datastore from the dropdown.

- Click OK.

- Click Next.

- Under HA Interface Configuration, click Connected To.

- Select the appropriate Logical Switch or Distributed Portgroup and then click OK.

- Click Add(+).

- Enter the Primary IP Address and Subnet Prefix Length and click anywhere the window.

- Under Configure Interfaces for this NSX Edge click Add(+).

- Enter the Name of the interface, and select either the Internal or Uplink option.

- At Connected To click Select.

- Select the target Logical Switch and click OK.

- At Configure subnets, click Add(+) and then add the Primary IP Address and Subnet Prefix Length.

- Click OK.


- Click Next.

- Select the appropriate interface from the vNIC dropdown and enter the Gateway IP address.

- Click Next.

- Click Finish.

Configure Local Egress
All sites in a multi-site cross-vCenter NSX environment can use the same physical routers for egress traffic. However, if egress routes need to be customized, the local egress feature must be enabled when the Universal Logical Router is created.

Published on 13 October 2017 by Christopher Lewis. Words: 612. Reading Time: 3 mins.
- VCAP6-NV Deploy - Objective 6.1 - Configure Cross vCenter VMware NSX infrastructure components ()
- Achievement Unlocked - VMware Certified Implementation Expert 6 - Network Virtualization ()
- VCAP6-NV Deploy - Objective 4.2 - Configure and Manage Service Composer ()
- HOWTO: Configure VMware NSX-V Security Tags ()
- HOWTO: Generate Self-Signed Certificates in VMware NSX-V ()
